Last updated: Dec 3, 2018. No Comments
“A picture is worth a thousand words” – a famous proverb which is still valid in this modern era in defining the importance of pictures in our lives. Images are the essence of the modern web without which it is difficult to establish a long lasting impression on your visitor.
Having said that, images where can help you in engaging your visitors and minimizing the bounce rate, they can also be the cause behind poor web performance. Search engines such as Google does not like slow loading websites and heavy images can significantly slow down the time it takes to load a web page.
Worry not! Because in this article we intend to cover all the aspects of optimizing images for web and will learn how to maintain fast loading time all while using good quality images.
ATTENTION: Click Here To Get Over $100,000 Money Transfer Through Bank Transfer Hackers!!!
ATTENTION: Get Your Hacked Western Union MTCN Transfer and Cash Out Over $2500 within minutes!!!
ATTENTION: Click Here For Your Blank/Cloned ATM Cards for ATM Cashout and Online Purchase!!!
Table of Contents
- Benefits of Optimizing Images
- How to Optimize Images for Performance?
- Optimize Images for WordPress Using Plugins
- What Are SVGs And Benefits of Using Them
- Build For Mobile
- Best Practices For Using Images on Web
Benefits of Optimizing Images
Optimizing images for the web has a lot of advantages which unfortunately are neglected by the majority of web developers and owners. Let’s look at them one by one and see what each can contribute to the performance of your website.
1. Lighter Website
Heavy images occupy more disk space of your web server and retrieving them from the server to display on a browser requires more bandwidth. This might not be an issue for the sites hosted on a server with large disk space and bandwidth capabilities but it does add up to hosting expenses.
By optimizing the images one can save both the disk space on the server and the bandwidth involved in displaying those images. It also improves the speed at which images are loaded on the web page even with the slow internet connections such as 2G network on mobile devices.
2. Enhanced Performance
Lighter websites perform well as compare to heavy websites as they take less time to load all the assets and the desired functions load properly to serve a specific feature on that web page. Images which are optimized for web follow the best practices suited for all kinds of browsers and multiple screen sizes which enhance the performance of your website.
3. Improved User-experience
When the website loads fast and functions properly; its overall user-experience is elevated for the visitors browsing that website. Visitors enjoy, retain and most likely to revisit the website which loads faster and get them to their desired information quicker.
Improved user-experience can be achieved by implementing best practices while structuring your web page and by optimizing the images. This is all about displaying the data in a user-friendly manner to the end user.
4. SEO Benefit
Not only visitors but also the search engine like Google loves fast loading websites and in one of their official blog post, they even stated that the page speed would also be a ranking factor in their new ranking algorithm.
When we optimize images for the performance we are also working on improving its SERP ranking. Google gives preference to those websites which load quicker and penalize the slow loading sites. This way the search engine makes sure that the visitors are presented with the sites which are optimized for speed to avoid bad user-experience.
Let’s put it through a test
In order to see the working in action, we set up a little test environment of our own, in which we added eight JPEG images of size 1MB. Below are the test results of before and after optimizing images for performance.
Before Optimizing:

After Optimizing:
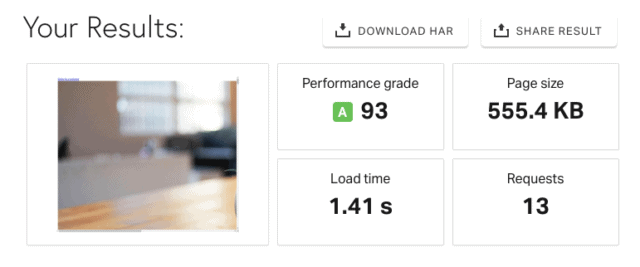
After optimizing the images we managed to speed up the load time from 1.66 seconds to 1.41 seconds and the number of requests is reduced from 26 to 13. This is not much as we only had eight images but imagine the difference it can bring to the site’s performance having hundreds of images.
How to Optimize Images for Performance?
Now that we have understood the benefits of optimizing images for performance; our next step would be to learn the ways of optimizing images for better performance.
These techniques can be used individually as well as collectively depending on the level of performance you wish to achieve with it.
1. Choose the Right File Format
There are various types of file formats available for images that are used on the web. Choosing the right format for your website is essential.

PNG (Portable Network Graphics): This image format usually uses lossless compressions (discussed later). Image quality is high and so is the file size. It is one of the popular file format being used on the web.

JPEG (Joint Photographic Experts Group): Image quality of this file format is lower than PNG but also has the reduced file size. It uses both lossy and lossless compression algorithm and is widely used in digital cameras and on the web.

GIF (Graphics Interchange Format): This image format only uses lossless compression and is ideal for animated images due to its small file size.
JPEG is a commonly used file format due to its small file size the flexibility it offers in defining the image quality of your choice. PNG is also very popular and used when we need a transparent background which is not possible with JPEG file format. PNG files are of high quality as they are not as compressed as JPEG are, therefore, are used in less quantity and for smaller images.
GIFs are getting popular across the web for displaying animated pictures, especially on social media and blog posts. It is an effective way of conveying a short message or joke through pictures.
Other file formats like WebP can also be used which is almost 30% smaller in size and supported by 75% of the modern browser.
2. Start Image Resizing and Compression
Image compression is essential for optimizing images for the web. However, this can get tricky and if not done right can affect the quality of the image.
Let’s see how to properly resize an image for the web without losing its quality and how to further reduce its size with quality compression.
Image Resizing
When we talk about resizing an image, we are talking about actually resizing it and not by just shrinking it implicitly using HTML and CSS which is applied when the web page is rendered by the browser.
- <h2>XYZ Product Detail</h2>
- <!– DO NOT USE this as it will load the full-size image and the browser does the resize –>
- <img src=”image.jpg” alt=”full size image” width=”400″ height=”400″ />
- <!– USE a resized image where the resizing is done from the server and there is no need of browser-side resizing–>
- <img src=”resized_800x1000_image.jpg” alt=”resized image” />
For example, if you wish to use an image of dimensions 2800 x 4000 px as a product’s display image of size 400 x 400 px then instead of defining its height and width attributes in your HTML code, resize it before it is sent to the browser by the server. This will not only reduce the time at which your web page is being loaded but will also save the disk space and bandwidth of your hosting.
Similarly, a lot of developers overlook the need of resizing the images with respect to the website’s layout. Images which were sized for the old layout might not be of the right dimensions for the new layout. For example, if previously you were using the banner image of size 1400 x 1600px but your new layout only has space for a 900 x 1200 px image you can save a few KBs just by resizing it for the appropriate dimensions.
Image Dimensions
A very common misconception is that only the images of large pixel size guarantee the best quality on the web page and sometimes people even use images of 2000 to 5000 px even though the most commonly used size for large screens is 1926 px wide.
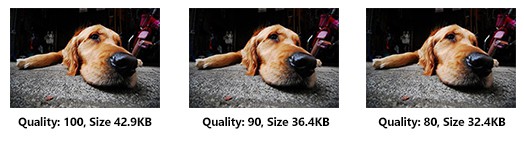
3. Keep An Eye On Image Quality
Quality of an image represents its visual representation on the web page. Reducing it properly does not affect its quality but reduces its file size which is exactly what we need in order to optimize it for the web.
Quality of an image can be reduced from 100% to 0% depending on your requirements. Higher the quality is larger the file size will be. Usually reducing the quality of an image by 10% to 20% does not have any visible impact on image quality but it reduces the file size by a few KBs.
Quality of an image can be compressed either by reducing the quality manually using a photo editing software or by using ImageKit which is a tool that converts images into WebP format and compresses then where possible.
4. Understand Lossy and Lossless Compression
We saw earlier in the file format section that an image can be compressed either in Lossy or Lossless compressions. Let’s explore them one by one to understand both the techniques.
Lossy
In this type of compression when the image is compressed it loses its information. This lost data may not be noticed by the user but it can significantly reduce the file size. Upon uncompression of this type of file, only part of the original information is retrievable. Lossy compression is used by JPEG file format which usually has a small file size and by using this file format user can define the loss in data without compromising the quality of an image.
Lossless
In Lossless compression when an image is compressed, all of its information is intact and upon uncompression, no information is lost. Since all the information is present, this type of compression does not hurt the quality of the image but it needs to be uncompressed before it is rendered.
Both Lossy and Lossless compressions can be performed using Adobe Photoshop, Affinity Photo or FileOptimizer.
5. Use Images Optimization Tools
There are tons of free and paid image editing software available which can be used to optimize images for performance. It all comes down to your preference and the type of optimization you seek.
Here is the list of a few popular and effective image optimization tools:
Optimize Images for WordPress Using Plugins
Optimizing images for WordPress website is equally important and If your site is built with WordPress then you can optimize images using WordPress plugins. Let’s look at some of the effective WordPress plugins for image compression.
Note: Although plugins are great and easier to use, its still a good practice to reduce the file size of an image before uploading to WordPress to save the disk space of your hosting server.
1. EWWW Image Optimizer

EWWW is a popular image optimization plugin for WordPress. When installed. It can detect all the images and start optimizing them and does the same when a new image is uploaded. It is capable of running optimization tasks in the background so the user can perform other tasks uninterrupted. The plugin also supports unlimited file size.
2. WP Smush

Another popular and effective WordPress plugin developed by WPMU DEV for image optimization. WP Smush is known for its high performance and user-friendly interface. This plugin also supports image resizing which automatically resize large images while compressing as per the width and height defined. Like EWWW, WP Smush also detects new uploaded and images and compress them.
3. ShortPixel Image Optimizer

ShortPixel is the third image compression WordPress plugin in our list. This a user-friendly smart WordPress plugin which also compresses PDF files along with images. The plugin supports both Lossless and Lossy compressions for all popular file types.
What Are SVGs And Benefits of Using Them
Scalable Vector Graphics or SVG for short is a scalable vector mainly used for simple images, logos and text. The SVG file contains text which defines the lines, curves, and shapes. Let’s look at some of the benefits of using SVG along with other images.
- SVGs are resolution independent and can scale for any screen size easily.
- They are programmable and can be configured easily to achieve the desired results. For example; creating charts and graphs dynamically.
- They are indexed by search engines same as PNG or JPEG images.
- They have usually smaller files size as compare to its competitors.
SVGs are great and have a number of use cases. It is the format supported by the majority of the web browsers and devices.
Build For Mobile
If you are serious about optimizing images to improve the website’s performance then it is a mistake to neglect mobile devices. Almost 60% of the global traffic comes from mobile devices as more and more people are relying on their mobile devices to surf the internet.

Having a mobile-friendly website is a must these days as no business would want to lose the traffic coming from the mobile users. Images used in these websites can be optimized for mobile by using responsive images. This way you give the list of variants to the browser of a particular image suitable for various screen sizes.
Also, the Device Pixel Ratio or DPR for short plays an important part in displaying high-quality images in small devices. Devices with high-density screens have more pixels packed per square inch as compare to a regular screen.
To avoid images getting blurred in these devices, use 2x size image on screens with DPR 2, a 3x image on screens with DPR 3 and the normal image 1x size image.
Best Practices For Using Images on Web
So far we learned how to optimize images for performance and the tools that can be used to resize and compress these images for the web. Before we reach the conclusion, let’s look at some of the best practices and additional techniques for optimizing the images.
- Resize the images appropriately before uploading them to the server.
- Compress images to reduce unnecessary file size.
- Use SVG wherever possible.
- Use CSS3 effects.
- Resize the images instead of defining width and height in HTML.
- Use web fonts instead of placing texts within the image.
- Use file formats (JPEG, PNG, and GIF) appropriately.
- Use alt text.
Content Delivery Network
Content Delivery Network (CDN) is a smart and effective technique of serving static content including images to your global audience. CDN servers are spread across the globe and instead of fetching data every time from the web server, they deliver the copied content from the nearest node from the user’s location.
CDN simply minimizes the distance between the web server and the user browsing the website from the other corner of the world. This does not only deliver the content faster but also reduces the number of requests sent to the web browser.
Lazy Loading
Lazy Loading enables the web page to load the images only when the user is navigating to that particular area of the page. Instead of loading all the images at once, websites using Lazy Loading can load images in segments, giving them more time and resources to load the initial page at fast speed.
Browser Caching
Browser caching enables the website to store its static data inside the user’s browser so the next time it requests for the same data it is served instantly from the local storage. This technique is useful in improving user-experience but requires some care when implemented on the website using dynamic pages such as shopping cart in an e-commerce store.
Final Thoughts
Optimizing images for performance is crucial as more than 50% of the web page weight is due to images. In the article above, we understood the benefits of optimizing images and explored the ways of doing so. We also learned how to optimize images for mobile and in WordPress by using three famous plugins and lastly, we learned best practices to optimize images for better performance and enhanced user experience.